BankTree Online Personal Finance - Imports
BankTree Online Personal Finance will allow you to bring your data files from other software applications or from your Bank / financial institution.
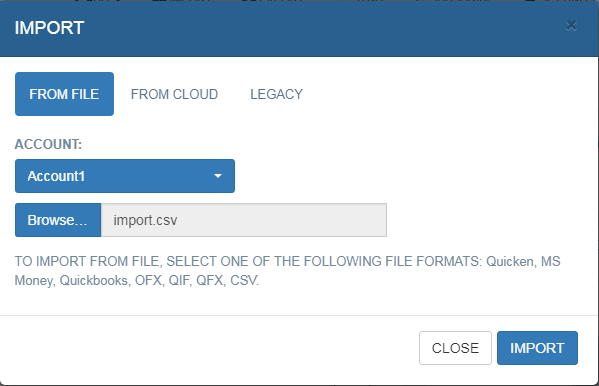
Click on the Import icon on the top menu and the Import screen is shown.
Import From File
Click the From File tab, if it's not already selected
- Click the BROWSE button to select your data file, you can pick a CSV, OFX, QIF and QFX file type. This article will go through the process of importing a CSV file. For a CSV file you will also need to select an account. Now press the IMPORT button to import your data file.

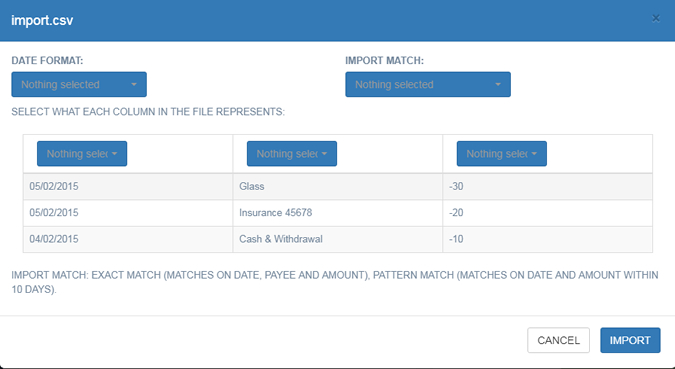
- The CSV File will be checked and a preview of the file will be shown. In the preview screen you are asked to provide details of the import file before the import can start.

-
Date Format select the date format that matches the file preview, you can select from DAY/MONTH/YEAR, MONTH/DAY/YEAR, YEAR/MONTH/DAY. If the correct date format is not selected the dates will not be imported correctly. The date format you select has nothing to do with how you want the dates to look like.
-
Import Match, You can also choose how duplicated records are dealt with. Import All; Imports all records without duplicate checking - use this option if this is the first import. Exact Match; skips any record which does not match on exact date, amount and payee. This will also check manually entered transactions and schedule transactions. Pattern Match; Imports all records but flags transactions for matching that are 7 days before or after the import date for the same amount. This will also check manually entered transactions and schedule transactions.
-
Columns, For each column header you need need to select the correct column to import into. Every column needs a selection. If a column contains information that can not be imported such as a balance column you need to select the option SKIP.
-
Click the IMPORT button to continue with the import
On completion, the transactions will be imported. If you are importing one of the other file types (QIF, OFX or QFX) you do not need to select the columns as these are automatically mapped. Categories are imported based on the following rules: If a payee has not been imported before, then the transaction is categorised as Income or Expense based on the amount field only. If the payee has been imported, and has been categorised, the last used category for the selected payee will be used. If the payee has an entry in the import text field (see payee screen) then any matching entry against this, will match on the payee. The category for the last used payee is again used
Updated: 22nd October 2017